Ignore our mismatched dressers. This is how they will stay until we move back to the states and invest in some adult ones.
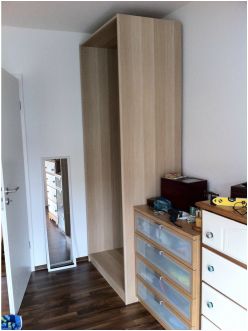
We got the shell of one of the wardrobes built this weekend and it is a BEAST! This seems to be the never ending task! We need to get the other shell built today as well. We can't put the interior elements in until we get the correct screws so that we can secure them to the wall.... grr..
Ignore our mismatched dressers. This is how they will stay until we move back to the states and invest in some adult ones.
0 Comments
Towards the house anyways...
We hung a few more things with Jason's new power tool (a concrete drill - picture Tim the Toolman doing his Argh Argh noise). The giant boxes that contain our Ikea wardrobes are still in the middle of our bedroom floor, but these new shelves in our kitchen were a nice check off the list! Fingers crossed the mugs don't come crashing down in the night! We have our first house guest coming on Friday, one of Jason's old classmates from Georgia, so our goal is to get the wardrobes built sometime this week! I'm working on a blanket for a friend. This is the biggest knitting project I've taken on so far and it has been challenging. My pattern is seriously simple, but being a beginner, it still trips me up sometimes. Working on metal circular needles was a hard adjustment. I re-started it 3 times before committing to this final attempt.
I'll post more as I get further along! I decided to finally make the table runner that I bought fabric for last spring! It always takes much longer than I expect, but I think it turned out pretty good. Its very springy!
I purchased the fabric from Pink Door Fabrics on Etsy. We gave the half bath at my mother-in-law's house a refresh over the holiday. It was QUITE a task! We kept running into issues at every turn. We had problems with the plumbing, we uncovered a horrible ceiling patch job when we removed the popcorn off the ceiling, the paint we bought ended up requiring four coats instead of the intended two, the hardware to the sink and toilet were completely corroded, etc. But its done, thankfully! Here's some photos of the process and the finished product. It was hard to photograph because it was so tiny! Somewhat before the work started. I didn't get in there with the camera quick enough before the wallpaper ripping started. It came off really easily on the walls away from the light, but the stuff closer to the light was tough. We think that maybe the heat from the light over time just set the glue. The color selection begins. All the wallpaper we have access to is off. Now the sink and toilet need to be removed so we can access behind them. The sink was not only caulked to the wall and floor, but was tipped back to the wall so it was caulked in a leaning position. We kept running into really poor craftsmanship as we moved through the process. I didn't get a photo of it, but next to the light fixture, the previous installers had cut in wiring from the light fixture to the light switch and instead of removing the wallpaper to patch the holes they made, they just applied netting and spackle OVER the wallpaper. So all that needed to be fixed in this process. The screws were so corroded on this old toilet that we had to drill into the screws to break them apart. We scraped the popcorn ceiling off using vinegar and water. It was a really messy job because the plaster gets glue-like as its being scraped off, but it came off fairly easily. Unfortunately we discovered this hideous patch job in the process that had to be carefully sanded, patched, and plastered. After removing the sink, we could finish removing the wall covering. We also had better access to the plumbing fixtures, which were very corroded from age. We replaced all that we could without making it a major plumbing job. Nothing like painting at midnight :) Apparently red is one of the hardest colors to get good coverage with. Who knew?! To make matters worse, we were painting directly on drywall, which I had never done before and it wasn't accepting the paint very well. If you tried to do more than one pass with either the roller or the brush it would start to clump and pull itself off the wall. It was horrible. We ended up needing to do 4 coats of the base color red. After finishing the 4 coats of base paint, we taped off vertical stripes with a laser level. The base coat was an eggshell and the stripe is a high gloss paint. The stripes are subtle and were really hard to photograph. I think the effect turned out really nice though. I had never done this before, so we were figuring things out as we went. Finished! This isn't the ta-da photo that I wanted (the room, again, was really hard to photograph). To my defense though, this was taken at 6:15 in the morning. We had worked through the night. I had just installed that shelf seconds prior and we were 15 minutes late to leave for the airport!
We installed a new faucet, drain, shelf, glass shades for the light fixture, towel rack, toilet and sink plumbing hardware, a new toilet, a GFCI outlet, new white switch and outlet covers, and purchased new accessories (towels, soap dispenser, basket for TP, and scented oil). |
WhitneyDaily Interests, Explorations, Thoughts, Adventures, and Discoveries Etsy Finds
Recent Recipe Pins
Categories
All
This work is licensed under a Creative Commons Attribution-NonCommercial-NoDerivs 3.0 Unported License. Archives
November 2015
|